Friday, October 5, 2007

GCode Scripting


A few years ago I bought a Taig Tools milling machine:


I find that there are a number of small projects that I would like to do that I don't really want to fire up a full CAD program to create, or that are more easily created procedurally, but that are also too complicated to write directly in gcode. To address this I've written a scripting program based on the Delphi version of the Pascal language that allows me to quickly create gcode output with some backplotting capabilities.

The application is currently in a functional proof-of-principle format, and so only supports a few built-in operations, such as slots and circle pockets. As I work with it these capabilities will be expanded so that most common operations will be easily accomplished. Don't hold your breath though, without a CNC machine at my disposal I'm not in a big hurry to work on this application.

When writing a script to output gcode it is useful to see a preview of the toolpath that will be generated. To this end I've included an OpenGL based 3D toolpath viewer. This allows the user to display a rectangular workpiece and the lines that describe the path of the tip of the tool. It does not currently create a simulation of the part that will be cut, nor does it indicate where the edges of the bit would be.

Since gcode generated from a script like this can be quite large I've compiled the script engine into a DOS program that can run on a DOS computer with a program like TurboCNC or CNCPro. This application can be used to edit, compile and run the scripts, and it can be used from a batch file with a script name as a parameter to generate gcode.

In the future I would like to improve the backplotter to make it a general purpose tool, so that it can take any gcode and display the tool path it generates, which will facilitate a number of functions of the program, most specificly the import of existing gcode files.

The application and example script files may be downloaded. If you try the application, please let me know what you think of it.


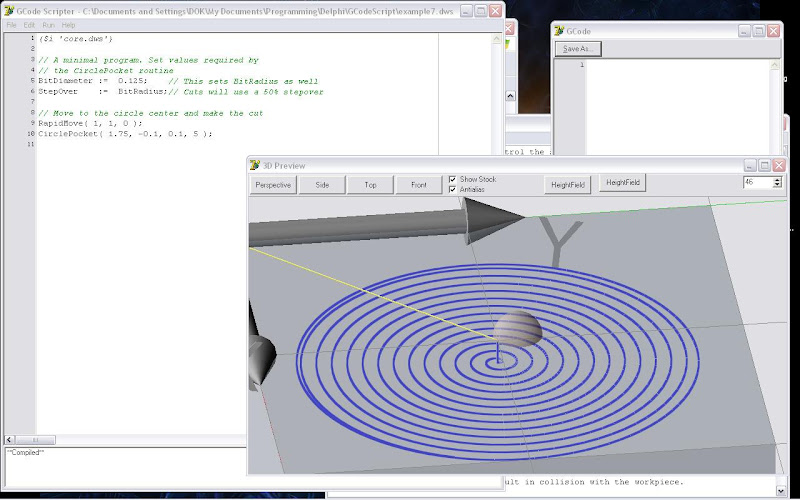
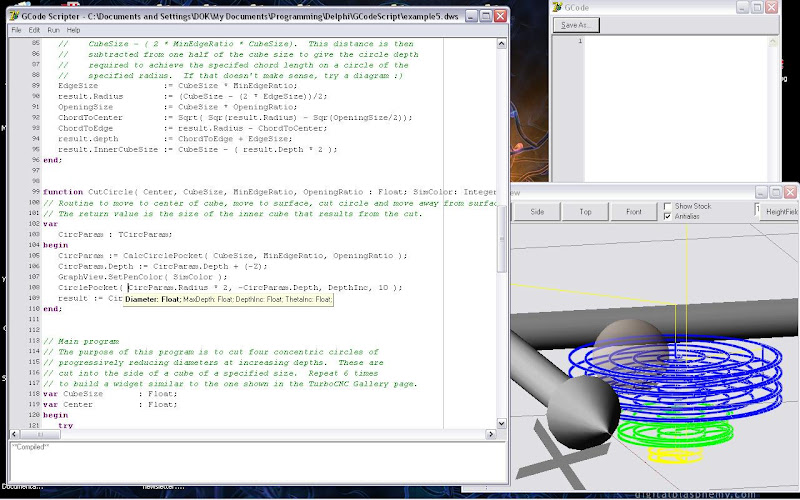
This is a very basic program to cut a circle pocket. The script code sets a couple of values required by the circle pocket routine, rapids to the desired location, then calls the circle pocket routine. At the bottom of the code window you can see that the code has been compiled. When the code is run with the 'simulation' flag on it generates the 3D graphical output you can see at the bottom right.


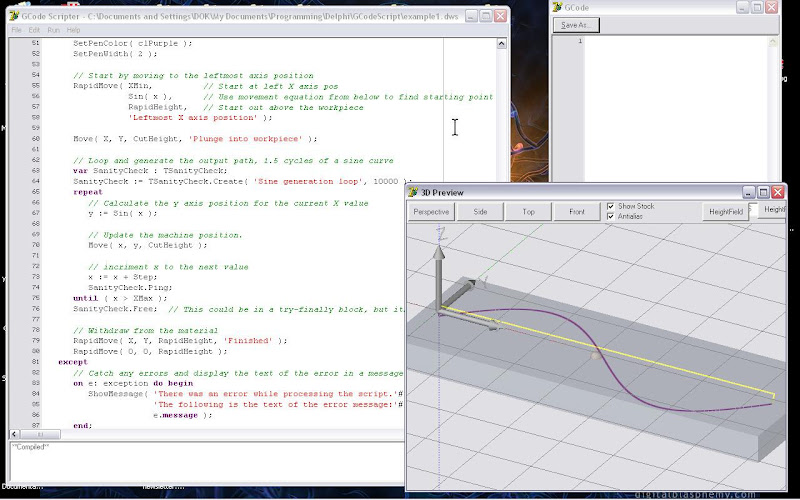
This is one of the example scripts that comes with the application. It calculates a simple path using the sin function. The code for the script is more complex and takes advantage of more language features. You can see use of some of the built in variables (X, Y and Z), the 'repeat...until' loop, creation of a helper object (the TSanityCheck object) and exception handling (if an error occurs it will generally create an exception that ends up in the 'except' block). In the 'except' block you can see a call to the ShowMessage() routine which will display the error message on screen.


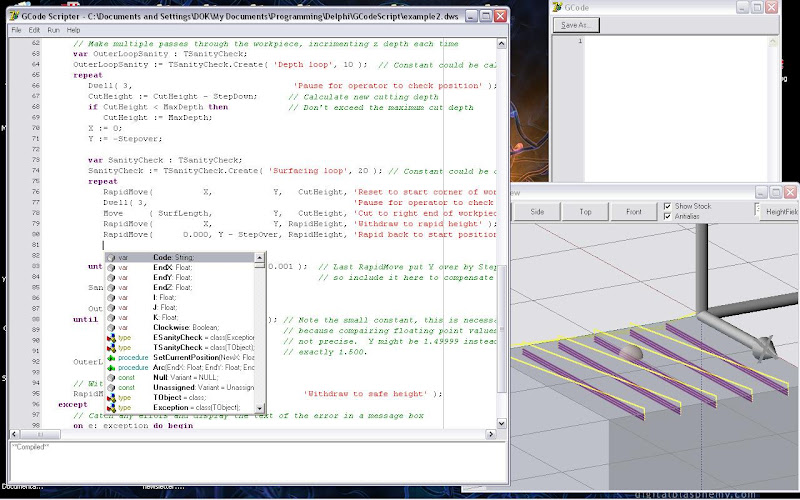
Here we see example script 2 which is used to face off a block. The user specifies in the script the dimensions of the block, the depth of each pass and the max depth and the script generates the necessary gcode. In the script window the use has pressed the Alt+Space hotkey to bring up the code insight window so he can look up available variables, classes and functions. This feature makes recalling and entering the names of functions and variables very easy.


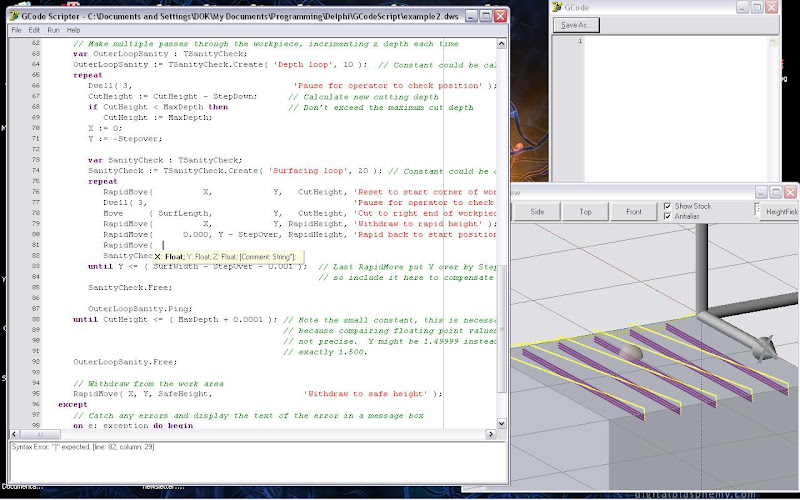
This is the same as the previous example, but displaying the parameter insight window. This feature displays on screen the parameters required for any given function. In this case the user has selected the RapidMove() function and you can see the X, Y, Z and Comment parameters with their associated types. Note that the Comment parameter is in brackets. This indicates that the parameter is optional and can be omitted if the user prefers.


This is from example script 5, a script that will generate the code required to cut successive circle pockets into a cube to create a nested cube object. The parameter insight feature is displaying the parameters for the circle pocket function.


The nested cube object looks like this:


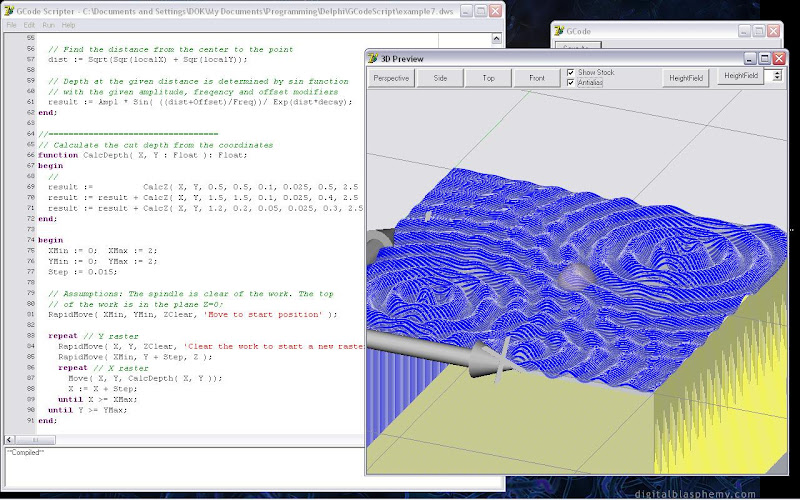
This example program uses a couple of subroutines to calculate the amplitude of a sine function that is defined at three locations on the working plane. These routines are used to calculate the Z depth as raster lines are traced across the face of the block. In the example I have set the rapid height to be negative (deep into the block) so that the cut lines can be seen more easily. The resolution of the figure can be adjusted very easily by increasing or decreasing the value of the 'Step' variable. As written the script does not automatically make multiple passes to reach a target depth, the figure must be cut in a single pass.


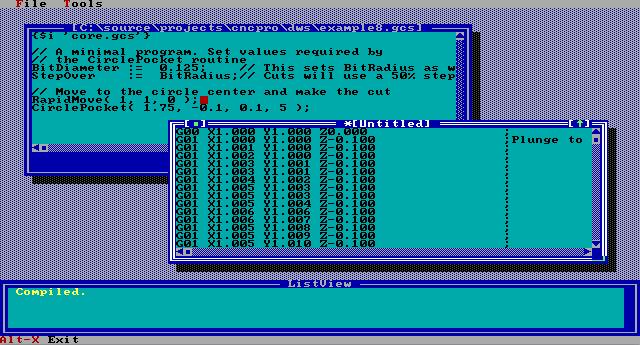
Finally, this is the simple script from the first example running in the new DOS script engine. The DOS application runs the same script engine as the windows version and so is able to run the same scripts to generate the same output. I'm still working on the user interface on this application (the Turbo Vision version I'm using has a few bugs to work out), but the script core is all working and is happy to run all the same scripts as the windows version, although it will ignore the graphical commands and does not include the code and parameter insight features.


Friday, September 21, 2007

Wireless Temperature Sensor

I've got some wireless temperature sensors that I was curious about.


The remote unit stopped working a while back, so I figured I'd open it up and see if I could find the problem. Yes, I checked the batteries first :)


There isn't anything obviously wrong with it, just a little crud left over from assembly. I figured maybe it absorbed water while it was hanging outside, so I cleaned it up. I put the batteries back in and it was working again. So I have no idea what was wrong, but at least it's going.

I opened up the receiver as well, just to take a look at the data stream that it receives from the transmitter.


As you can see, I've had to open it before to replace the battery wire. The little daughter board is the radio receiver and decoder, it connects to the main board with a 4 pin header. The protocol is a basic 433MHz OOK. The bit rate is very low, 2Hz. Here is the decoded signal.


Most of the bits (chips?) are 0.05s wide with 0.5 seconds between them. There are also some 0.14s bits (usually in pairs, but occasionally single). Sometimes the delay between bits is 1s, rarely 1.5s. Periodically there will be 10-15s of silence. I'll have to run the signal through one of the microcontrollers I have set up to capture data streams like this to get a good idea of what is going on. The scope doesn't have a long enough memory to let me see a wide enough window to see what's really happening.

Solar Powered Mobile Phone

I recently purchased a new phone from Virgin Mobile, a UTStarcom model they call the 'Slice'. It's about 3/8ths of an inch thick and very rectilinear. The standby time is 11 days on a 900mAh battery. Presuming that the phone uses the entire 900mAh over the 11 days, that is an average standby current of 3.5mA at 3.7v for about 13mW standby power. That is really low.


The Electronic Goldmine carries a small solar panel that it says produces, in full sun, a short-circuit current of 20mA with an open circuit voltage of 2.4v. Unfortunately, they don't give a figure for the power generated by the panel. I have no idea how to calculate that from the given figures, because the short-circuit voltage was not given. So, I'm going to try a ball-park estimate.


The panel is about 800 square mm. The photovoltaic material covers maybe 40% of that area, for a collector area of 320 square mm. Full sun is usually estimated to deliver around 1000W per square meter, or 1 milliwatt per square mm. The solar panel then receives about 320mW of power. If the solar cells are 6% efficient then the power output in full sun would be approximately 20mW.

If they produce 20mA into a short circuit in full sun, and if my estimate of 20mW is sane, then I should get sane values if I calculate the voltage and resistance of the circuit. Working out the voltage ( P=VI ) gives me 1v, which is sane. Working out the resistance ( P=I2R ) gives me 0.05 ohms, which is also sane.

So, one of the panels should provide, in full sun, about 20mW at 1v. Because I'm not often in the full sun, I have to derate this to about 1/3. To compensate I'll use three panels which, as it happens, fits nicely on the back of the phone. Connected in series I should get around 6mA at 3v in good lighting.


The phone requires a stable 5v supply for it's charger, so I'll need a power conditioner to boost the panel's output power to 5v. I can do this with a simple blocking oscillator, a small and simple circuit.

The phone charges its 3.7v 900mAh battery from a 5v supply in about 2.5 hours. Presuming constant current over the 2.5 hours that is 360mA at 3.7v, or 1.3W. Round it up for charge inefficiency for 1.5W. At 5v that is about 300mA from the charger, which is a switching model with a nameplate rating of 1A.

Assuming the phone draws around 300mA from the supply for charging purposes, and that if it can't get enough current it will behave poorly, I'll need to store up enough power so that the phone can charge for a resonable period before I run out of juice. Since the phone turns the screen on for 10 seconds when the charger is connected and disconnected and since that causes the phone to use much more power than the standby current (I'll have to measure that directly, no way to calculate it), I need to keep charge cycles to a minimum.

I'll need to use either a small 5v bank of rechargeable batteries (4 1/3AAA NiMH cells) or about 5F worth of super capacitors. The batteries store more power and have a better discharge curve, so they are probably the way to go. Four 1/3AAA NiMH cells at 1.25v each would put the output voltage right at 5v for most of the discharge curve, and they are good for around 200mAh, so they'd give about a 40 minute charge cycle, which is really good. A super cap would not provide as stable an output voltage, but depending on far out of spec the phone will allow the voltage to get before giving up, this may be ok. The super caps will handle the full 5v on a single 2.5F cap, so two of them would work.

If the panels provide 5mA it would take around 40 hours of full sun to charge the batteries. Of course I don't have to fully charge or discharge the batteries.

It seems like this is a fairly complicated scheme involving multiple power conversions and a large external power source. While I'm sure it would work, it's not something I'd really want to carry around on my phone or as a seperate device. The alternative is to bypass the phone's charge circuits and access the lithium battery directly. Since this is a trickle charge I wouldn't have to worry much about overcharging the battery. I would have to be careful about sending too high a voltage to the phone's internal circuitry.

I can use the panels to run a simple blocking oscillator with the output connected to the battery terminals. When the oscillator fires it will direct a short charge pulse into the battery. The voltage of this pulse would probably not be too much higher than the battery voltage, but in order to protect the phone I'd need to include a simple filter, perhaps just a small coil. I could also disconnect the phone from the battery and let it run from a capacitor while I take a few milliseconds to charge the battery, but that would take more components, and I'd have to make sure that the charge doesn't happen during a call when the phone is using high current (otherwise it would take a significantly large cap).

I would have to intercept the connections to the battery so that I could put the filter inline. A simple way to do this is to make a double sided PCB that can slide down between the battery and phone contacts. There is about 0.5mm of clearance between the battery and the contacts, so probably just enough room to get a thin board in. I could also open the phone and modify the battery contactor, but that runs a higher risk of breaking something.


This solution is much better than using batteries because I can do all the work with surface mount components and then mount the resulting circuit on the back of the phone with the solar panels. This gives me a very sleek installation that only makes the phone a bit thicker.

The solar panels I've got are probably not the best for tight spaces. As I noted above they only have about 40% coverage with acutal solar material, and the PCB backing they are on is pretty thick. I could probably get a bare cell and fabricate a more powerful, thinner panel. This would do a better job of keeping the phone charged under less than ideal lighting conditions.

Monday, September 10, 2007

Roomba Repair

Years ago I purchased a Roomba Red. It ran for about a year or so and then the left wheel quit working. I tore it down and replaced the motor in the left wheel assembly with a similar unit from Goldmine Electronics. After doing that, it occured to me that I should have swapped the wheel assemblies to see if the problem was on the main board or the wheel. Oops. Turns out the wheels were fine and the board was evidently having issues.


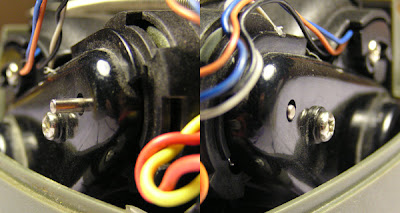
You can see in the photo that the shaft on the new motor is a bit longer than the old one. This doesn't seem to interfere with anything. I could cut it down, but I didn't want to risk getting metal shavings all over the motor, they can be a bit of a pain to clean off the magnets.

I shelved the unit for another year or so, and just now I'm getting around to doing something with it. I've disassembled it again and pulled the main board out.


Getting the mainboard out wasn't difficult. I took pictures of all the wire connectors so I could replace them properly later, then pried it out using the screw holes:


I found that the H-bridge's for the drive wheels are built with B772 and D882 complimentary PNP/NPN power transistors. Interestingly, not MOSFETs, which is what I expected. Here are the specs:
  • PC: 10W
  • IC: 3A
  • BVCEO: ≥30V
  • BVCBO: ≥40V
  • BVEBO: ≥6V
  • VCES: ≤0.6V
The transistors are along the edge of the board, at the bottom in this picture:


They are the four black bits:


I found the following note on a site documenting the Discovery model's diagnostic tests:
In prior drive-wheel-tests, the wheel-assemblies have been verified to contain functional motors, functional gear-sets, and intact drive-belts; and their 'forward-paths' through their electronic-driver circuits (a.k.a., "H- bridges" -- one per wheel) have been verified operational. The only thing new for Test-9.a to check, is the 'reverse-path' through each H-bridge. If both wheels drive the robot in reverse, the circuit is validated. If a wheel fails to rotate, it means there is a fault on the main-PWB. Often, the failed part is a power transistor -- which a small percentage of owners have been able to diagnose and replace. Most everyone else, must depend on getting another Roomba!
It sounds as if these transistors are known to go out. In my limited experience, the behavior of my Roomby indicates that a drive transistor is out. If it does turn out that this is the problem, here's hoping I can be one of the small percentage mentioned above. If not, I'll spring for a $25 replacement mainboard rather than a whole new roomba. I sure hope screwing with replacing the motor hasn't dorked it up too badly, in that case I'd have to track down a genuine Roomba wheel motor, which could be pretty pricy. I'm hoping that since it has the encoder any reasonable motor should be fine.

More later as the repair (attempt) progresses.

Update: Looks like Digikey carries the transistors for about $1.50 a pair:

D882 : Product PDF
B772 : Product PDF

I'll first do some more tests to confirm that these are the problem, then I'll see if I can find some more junk that I don't really need in order to get up to the $20 minimum order. I do need some beefy diodes to build a couple of battery desulfators and just to keep around for experimentation (I've been playing with a buck-boost circuit and a blocking oscillator and I need some bigger diodes).

Update - 2008-09-22

I received an order with 4 each of the transistors above:


As you can see, the appearance matches. Hopefully swapping them out will fix the problem. I don't actually have any evidence that the components on the main board have failed, but what the heck, for a buck fifty it can't hurt to replace them. If it doesn't work I'll trace back up the circuit path a bit and see if maybe the driver for this transistor is having problems.

Battery-Backed House Circuit

A few weeks ago we had some thunder storms where I live and the power was knocked out for about 4 hours. After the first hour I decided that the utility company was going to take their time fixing the problem and I was tired of sitting in the dark, so I wired a small 12v automotive inverter up to a spare car battery to run a floor lamp.

This quick solution worked well, but I decided I wanted something a little fancier than a dirty car battery sitting beside the lamp. Since my basement is not finished I have access to much of the first floor wiring, and since I've switched to exclusively using a laptop instead of desktop computers I am no longer using my computer UPS's. With those two facts taken together, my next step is fairly obvious.

I spent a couple of hours mapping out the circuits in the house so I knew what went where. As it turns out the overhead light in the dining room and most of the outlets in the living room are all on the same circuit. From the basement I could see the cable for one branch of that circuit, and as it happened it ran right above where I wanted to install a TV for the game room.

I turned off the power to that circuit, cut the cable about two feet from where it disappeared into the ceiling and installed a standard electrical outlet in a galvanized steel box. Onto the wire leading to the ceiling and the rest of the circuit I attached a 15A plug end. There is enough slack in the cable to connect the plug directly to the outlet to power the circuit as before, which I did while I set up the next step.


In this picture I haven't yet screwed down the outlet or tied up the cables.

I dragged out an old 350W Genica UPS I picked up a few years ago for $45. Normally this runs off of a standard 7Ah SLA battery, but clearly that would not be sufficient for my needs. I popped the top and built some leads to connect the battery cables to my spare car battery.

Right away in bench testing I noticed that the power handling components in the battery recharge circuit get very hot, probably upwards of 250F. I don't know if that is normal, but I don't know why the UPS wouldn't limit it's charge current to something it's components could handle. Whatever, I riveted an ugly 1.5"x1.5" scrap of aluminum bar to the tab on the hottest of the TO-220 components and let it run for a bit. The temperature stabilized somewhere around 'uncomfortably warm', down from 'sizzling' on the touch scale.

A week earlier my son ran the lawnmower over it's cord and cut it right in half, so as it happened I had a direct-wire extension cord I could attach to the UPS output to replace the factory outlets, which were built into the plastic top, which I had removed. I then dragged the whole assembly over near the new outlet, plugged the UPS into the outlet and plugged the rest of the circuit into the UPS.


Here I've got the UPS open with everything connected. The heatsink on the recharge transistor is on the right. The orange cord is wire-nutted directly into the UPS output wires, replacing the built-in outlets that were molded into the top of the UPS. I don't intend to use the top, though I probably could have. The car battery is off to the right, connected with some old speaker cable with spade connectors that fit very nicely into the original battery connectors. Obviously I won't leave this cobbled up this way for the final install, but for testing it works nicely.

It was about this point I discovered that the UPS cannot cold start onto the battery the way my APC UPS can. That is a bit of a bummer as it means that once the UPS turns off when the power is out, I cannot start it again. That would be a valuable feature in the event of an extended power outage. I may have to track down the bits of the UPS circuit that monitor the line power and see if I can fool it into doing a cold start.

Once I had gotten the UPS running the circuit off battery I discovered that only half the outlets I had anticipated powering were actually powered. Evidently the circuit has two branches and I was only powering one. At first I was disappointed, but it occurred to me that since it was a 20 amp circuit and I had two 10 amp UPS's that wasn't such a bad thing. I'll just track down the other branch and put the other UPS on it.

I haven't found any loads the UPS doesn't like. It uses what they call a 'modified sine wave' output, which looks to me like a simple square wave, but what do I know. The compact fluorescent bulbs like it, the air pump, filter and heater for the fish tank like it, and the TV and cable box like it, so I guess it'll do.

Before I set up the circuit I load tested the battery and UPS by powering the TV and cable box, which average about 85W. I had charged the battery with the car battery charger, which brought the battery up to about 12.5v. From that level it ran for about 70 minutes. I figure after conversion losses I was probably pulling around 8A or so from the battery. Since 12.5v is a fairly low charge level (the UPS brings it up to about 14.2v before the charger cools down) I'm guessing I can probably get around 20AH capacity from the battery, maybe more if I leave a desulfator on it for a few weeks (that'll be another post). If I can get it up to 25AH and I keep my loads to two compact fluorescent lamps with occasional use of the dining room overhead light (5 CF bulbs) for an average load of about 50W I should be able to get about 6 hours of run time. Eventually I'd like to move up to a 100Ah battery which would give me enough power for a couple of days of lighting, and it'll be happier about doing deep cycle duty than this car battery.

Update: I stopped by Wal-mart on the way home from work today and checked out their deep cycle offerings. They have a group 29 (big) deep cycle battery that works out to about 148Ah for about $75 after taxes. They also have a 115Ah deep cycle for about $65. I've read good things about the brand, so I've noted those batteries on my mental wishlist. I'd love to get about 6 of those and several of the automotive inverters in various sizes and set them up to run all the interesting circuits in the house. I figure that with such a setup I could run most of the lights and the microwave for several days before I'd need to recharge.

Of course at that point I'd be getting into needing a transfer switch and some other equipment too, at which point I might as well just spring for a standard commercial house backup and get true sine output (not that anything I've got seems to give a crap what the waveform looks like).

Update 2009-Feb-9

I have obtained an APC Smart-UPS 1400 from the discard pile at work. Evidently the battery pack was dead and they are moving to a different UPS system anyway, so it wasn't worth it to replace the battery. I pulled the pack which consists of two 17Ah SLAs disconnected them and checked the voltage, 5v on one and 4v on the other. In other words, doorstops.

Fortunately, work was also discarding an expansion battery for another brand of UPS that was giving them trouble. I was able to salvage a couple 17Ah cells from that and while they were a little low initially they charged right up and held the charge for a couple of days. I stuck some 3M Command adhesive between them and bolted them together as a battery pack and stuck them into the APC and it started just fine and will carry a light load with no problem.

Next will be load testing the UPS to see if the batteries are performing at a reasonable level. If so I'll set this UPS up as the backup for my house circuit. It has more than double the capacity and doesn't need any hacking to be useful.

Purpose

The primary purpose of this blog is to document my various and sundry technical projects. These range from programming to electronics and hardware hacking. I'll even try to post pictures once in a while.